Take a set of smallish double pointed needles and cast on an appropriate amount to go around your calf divisible by 4.
I'll throw some numbers out there for you just to make a trial pair, but these are so readily adaptable you can swap out needles, yarn weights, and body sizes with only second grade math skills.
So for the sake of learning lets say I have sock weight yarn in something that has some give (no cotton or linen without some synthetic additive) like 80/20 wool and nylon, size 2 US (2.75mm) needles...I'd cast on 56 stitches for a skinny leg or 60 for a big fat leg like mine or even 64 if I want them to go up over the biggest part of my calf.
Knit 2x2 rib (k2,p2) until you get sick of it...most of the time it's between 12 and 20 rows for me, but you could do the whole leg portion if you'd like. Continue down the leg in Stockinette Stitch (that's knit only when in the round) until the sock leg is long enough for your tastes and then work a separate waste piece of yarn for 1/2 of the stitches (example30 stitches if I had originally cast on 60) don't attach the yarn just leave the ends dangling. Go back to your main yarn, pick it up and continue working the sock in stockinette stitch. It's helpful to start the waste yarn at the beginning of a needle. Likewise, if you are using 4 needles instead if 5 you'll need to slip the remaining stitches onto the working needle so you can free up a needle to go back with, but you knew that.
 When the piece following the scrap yarn is the same length as your foot is from your heel to the base of your toes begin toe.
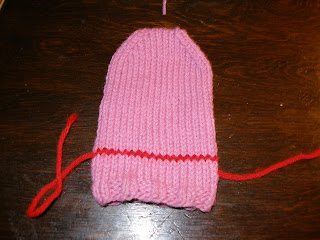
With the scrap yarn (this is where your heel will go) on the bottom (picture above shows the sock upside down), flatten out your tube and find the two edges where front ends and back begins. Adjust your needles so these are at the edges of your needles (like the beginning of one and the end of another).
The toe goes like this.
round 1 Beginning on edge stitch k1, ssk, k across to3 stitches before next edge stitch k2 tog k1, repeat for other half.
round 2 knit
repeat rounds 1 and 2 until there are about 8 stitches in between decreases and kitchener toe closed.
Now carefully take out waste yarn and slide your needles back into the live stitches and make a second "toe" for the heel. These are very cute if made with a contrasting color.

There are two known truths in this world. The first is that you will get a hole at the edge of the thumb on the mitten you are knitting and the second is that you will get a hole at the edge of the heel on the sock you are knitting. This is OK. You'll have a couple ends to darn in, so just make sure you pass over the hole and cinch it closed and you're good to go. I'll take care of this hole when Idarn in my ends - I just tucked them in for the picture.

Enjoy your socks!
PS - the sock in the picture was made with red heart worsted weight ACKrillic and size5 US needles - way fewer stitches (36 total) than the numbers I gave you, but the process is exactly the same.